How to search locations
Top Page
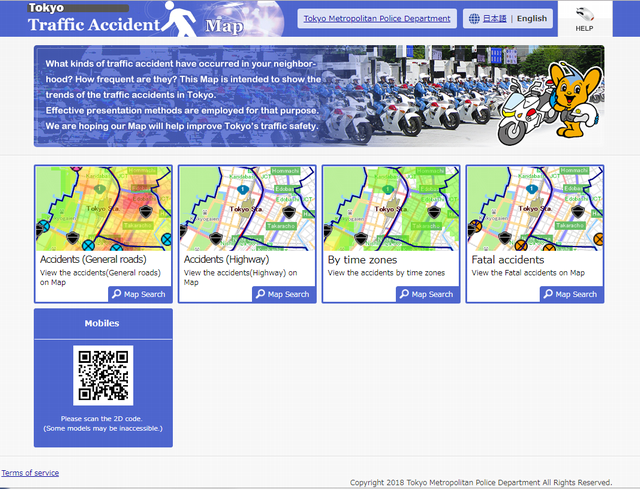
Top Page shows the following:
- (1) Information: The latest information is displayed.
- (2) Mobiles: Read the 2D code with your mobile terminal.
- (3) List of maps available: Choose name of a map and you will go to the Search locations page.
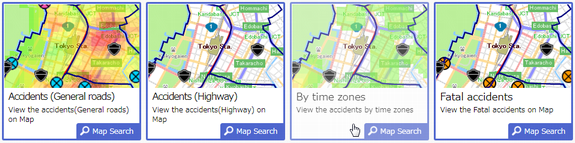
Select a map
Click the map image or [Map Search] button in the maps, and you wil go to the Search locations page.
If the Terms of Use appears, read it carefully and click [Agree] button.
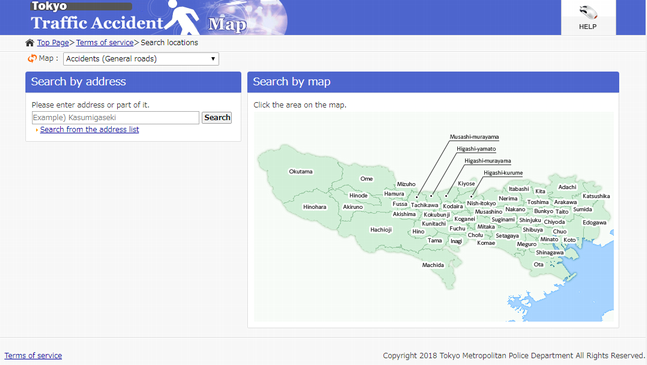
Search locations
Search locations page shows the following:
- (1) Map displayed: Shows the name of the map being displayed. You can also switch to another map from the pulldown menu.
- (2) Search by address: Searches for an address/zip code and displays the corresponding location.
- (3) Search by facility: Searches for information registered in the map. Not available with some maps.
- (4) Search by map: Click on the map and displays the map centered at the point.
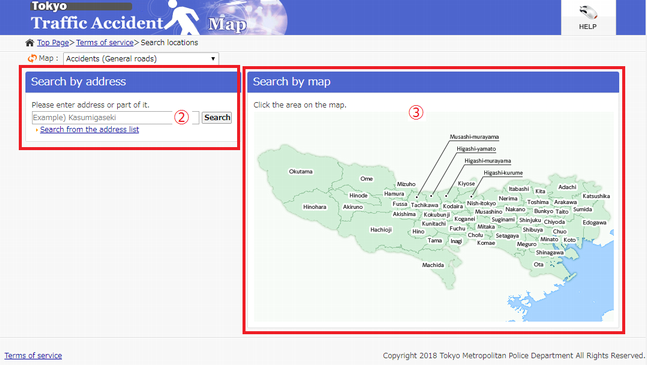
Search by address
You can specify the location in the map by seaching for an address.
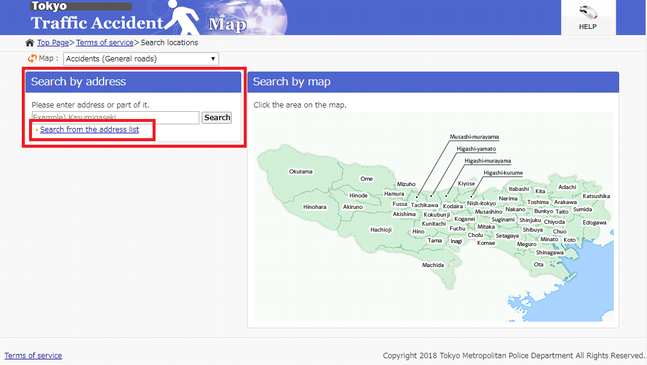
There are two ways to search by address:
Enter address/zip code or a part of it
Enter an address/zip code or a part of it, and click [Search] button.
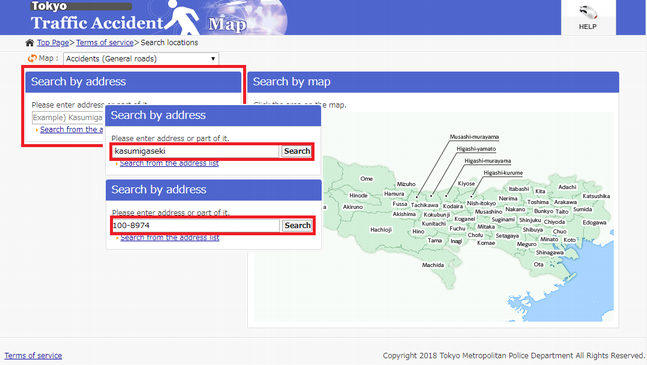
The list of search results corresponding to the address appears.
Click the address you want to view.
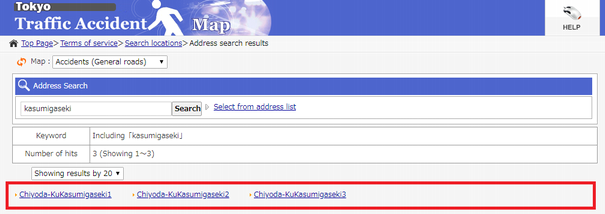
A map page centered at the address chosen is displayed.

Choose from the list of addresses
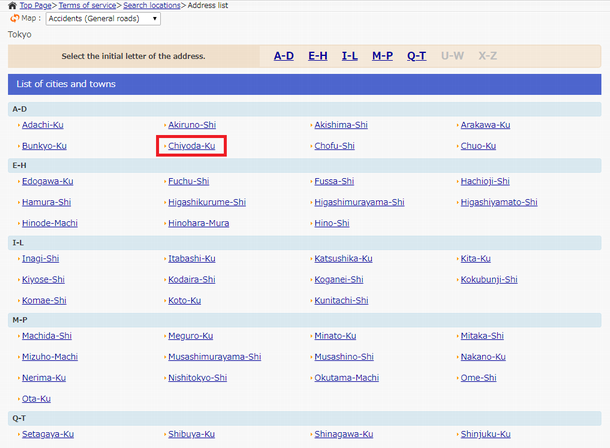
Click the link "Search from the address list".
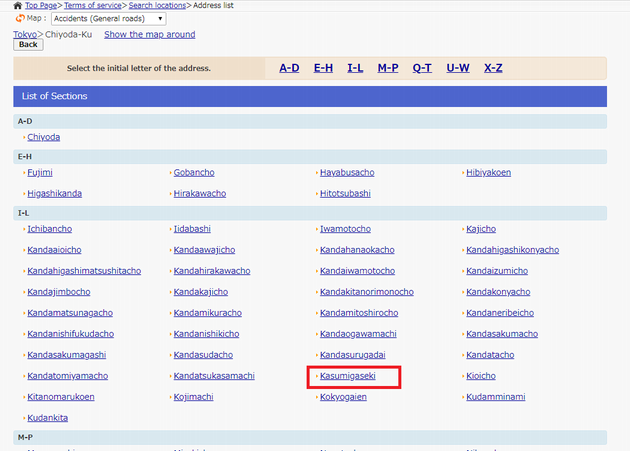
The list of Cities and Sections is displayed. ※Sample) Chiyoda-ku
The list of Subsections is displayed for the selected City or Section.
Select a Subsection you want to view. ※Sample) Kasumigaseki
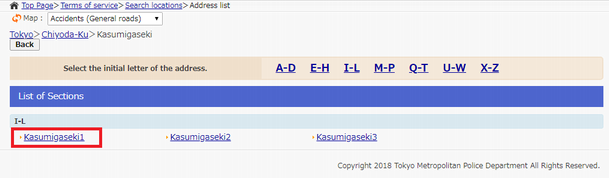
The list of Block Nos. for the selected Subsection is displayed.
Click the link "Show the map around", and you can stop narrowing down by address and view a map page.
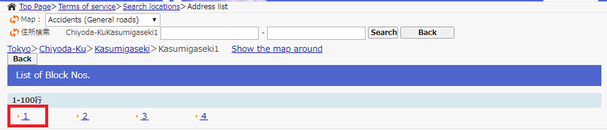
Select a Block No. to narrow down by address further. ※Sample) Kasumigaseki1
When a Block No. is selected, the list of Branch Nos. is displayed.
Select the link "Show the map around" or a Branch No. you want to view from the list. ※Sample) 1
【追加】When a Block No. is selected, the list of Branch Nos. is displayed.
Select the link "Show the map around" or a Branch No. you want to view from the list. ※Sample) 1

A map page centered at the selected address is displayed.
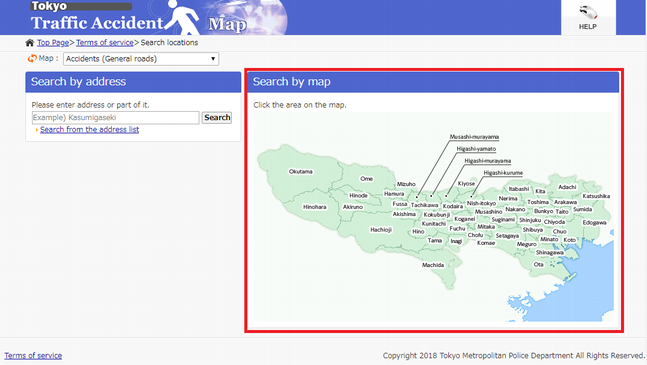
Search by map
You can specify the location you want to view from the illustrated map.
Click the location you want to view, and a map page centered at the address chosen is displayed.
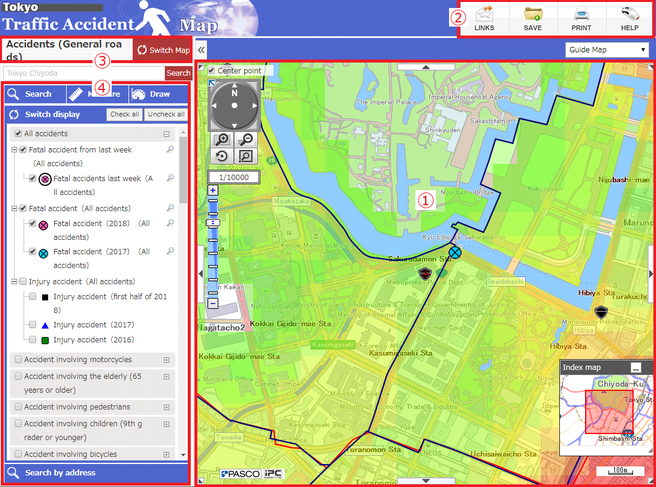
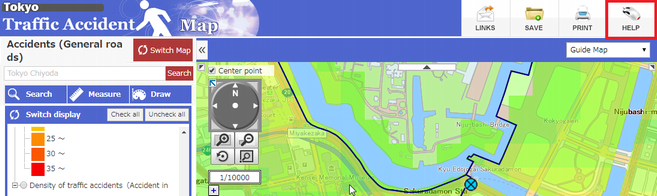
How to use map
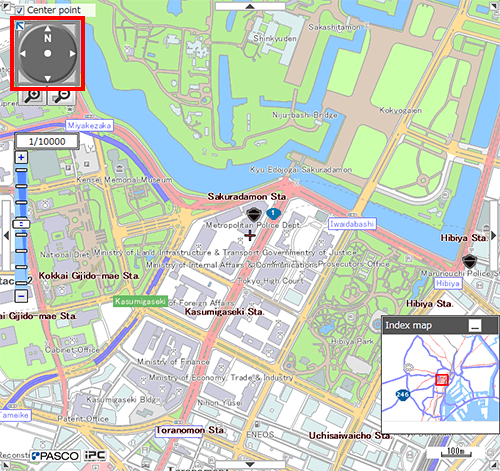
Map page
- (1) Display the map.
- (2) Select the map options you want.
- (3) Switch the type of map displayed.
- (4) Switch display/non-display of the legend (layer) on the map.
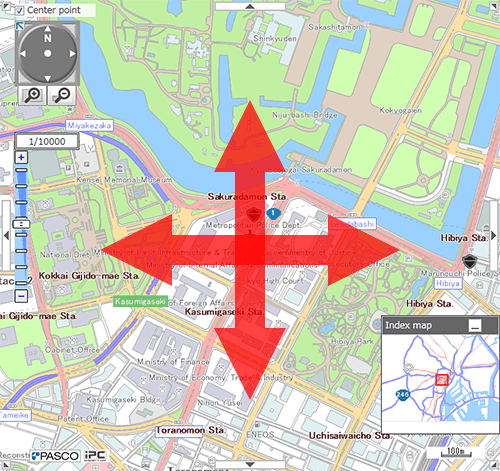
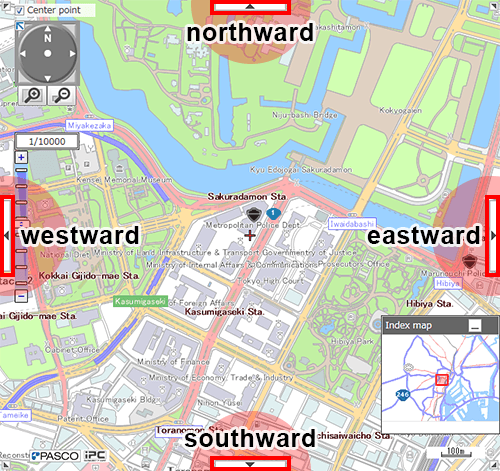
Move location
By drag
Place the cursor on the map and hold down the left mouse button. Move the mouse vertically and horizontally.
By arrow button
Click an arrow button on the outer frame of the map. The map moves in the arrow's direction.
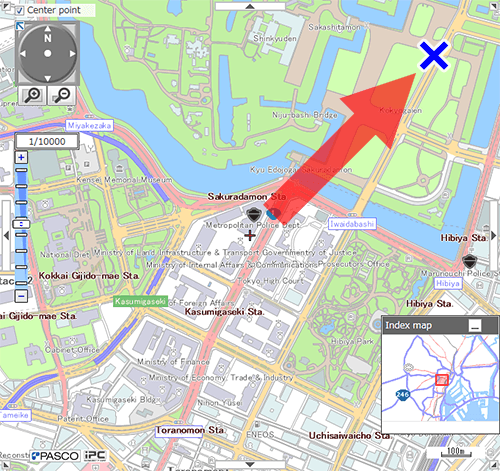
By double click
Place the cursor on the map and double-click. The map will be centered at the clicked location.
By direction arrow
Click a direction arrow and the map moves in that direction.
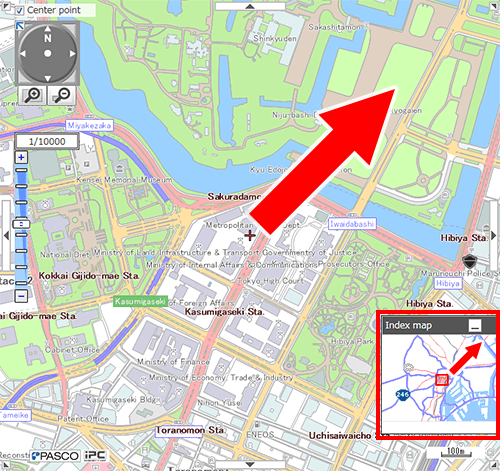
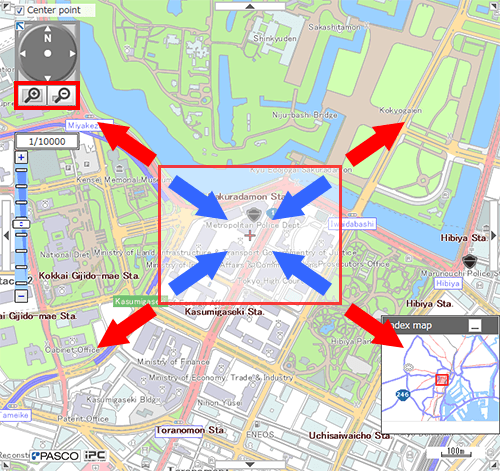
By index map
The red frame in the index map shows the display area in the map page. To minimize the index map, click the Minimize button in the upper right of the index map.
Drag the red frame to move the map page.
Change map scale
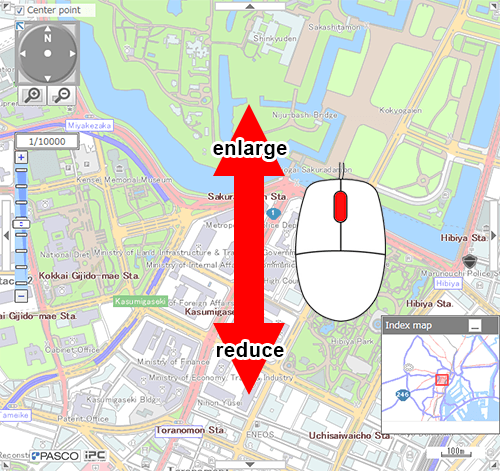
By mouse wheel
Place the cursor on the map and move mouse wheel vertically.
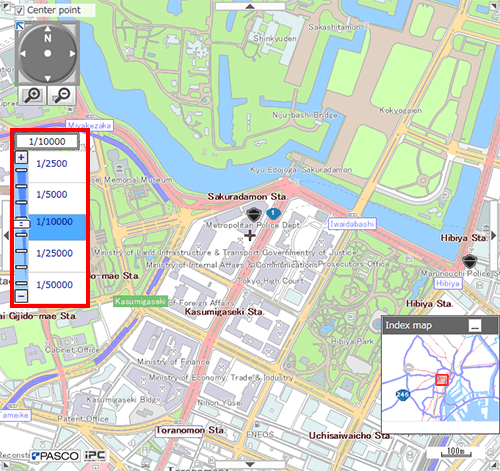
By scale bar
Click "+" (enlarge) or "-" (reduce).
By specifying area
Hold down "Enlarge area to the dragged point" or "Reduce area to the dragged point" and specify the area on the map.
* The map is displayed at a scale close to the area specified.

Switch map
Switch type of map
Click [Switch Map] and select the map you want to view.
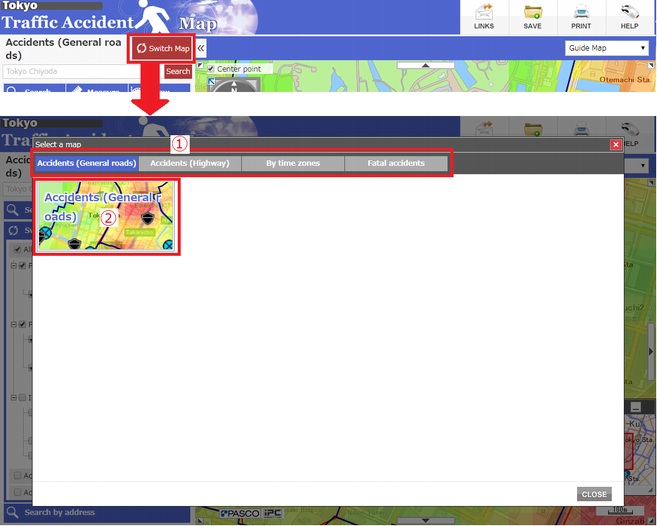
The selected map is displayed.
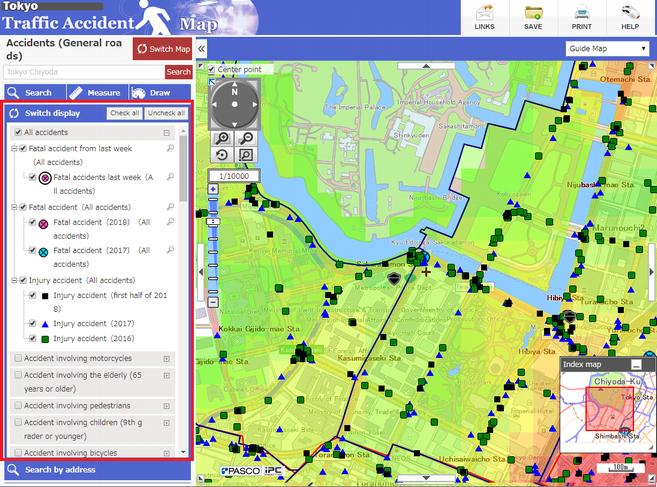
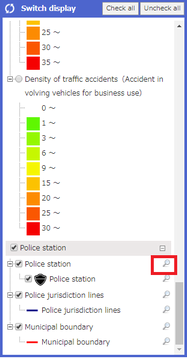
Switch data
Check the checkbox of the data you want to view.
Only the checked data will be displayed on the map.
* Click "Check all" or "Uncheck all" to select all the data for "display/non-display".
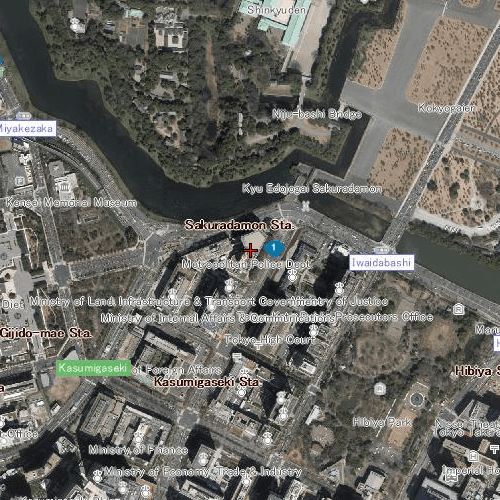
Switch background map
Select the name of the map to be displayed in the background.
The background you select is displayed.
* The background map displayable differs, depending on the type of map.
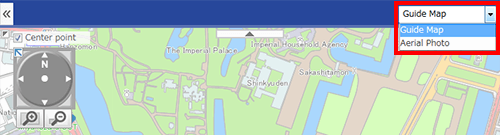
«Guide Map»
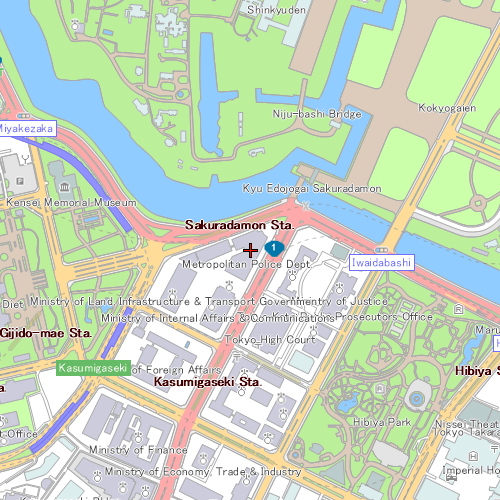
«Aerial Photo»
Display contents


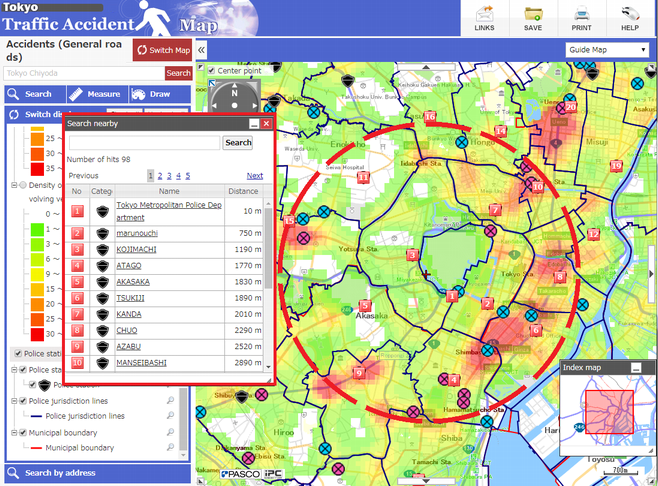
A map page centered at the selected feature is displayed.
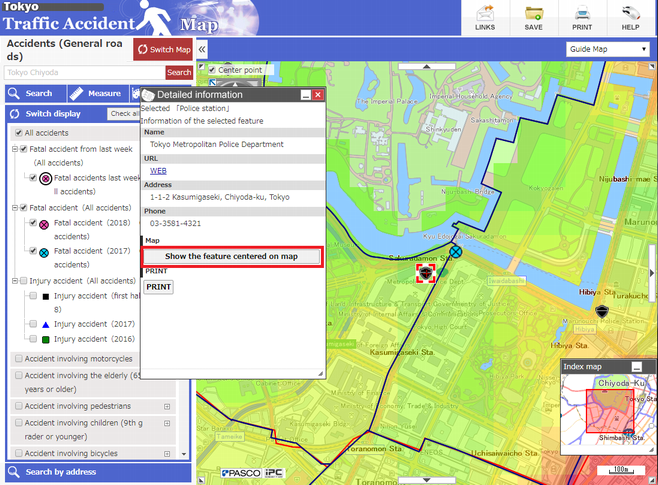
(1) Click the Magnifier icon at the right of the data name.
(2) Displays the nearby search results.
Click a facility name, and detailed information appears.
Click the X button at the upper right of the window to exit.
Use options
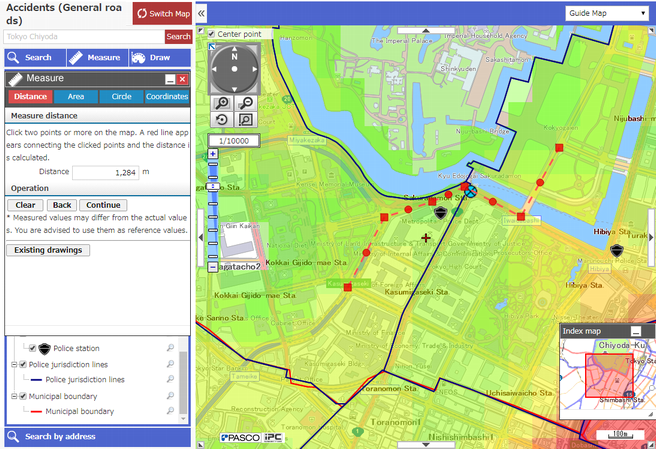
Measurement
Click [Measure] to display the Measurement tool. With this, you can make measurements on the map.
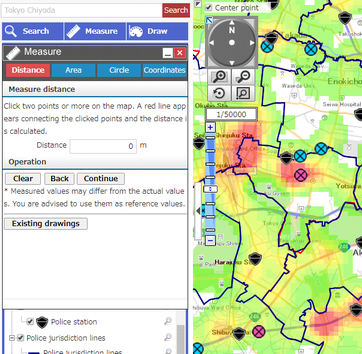
Measure distance
Select the "Distance" tab in the [Measure] window.
Click two points or more on the map.
A red line appears connecting those points. The "Distance" is also displayed.
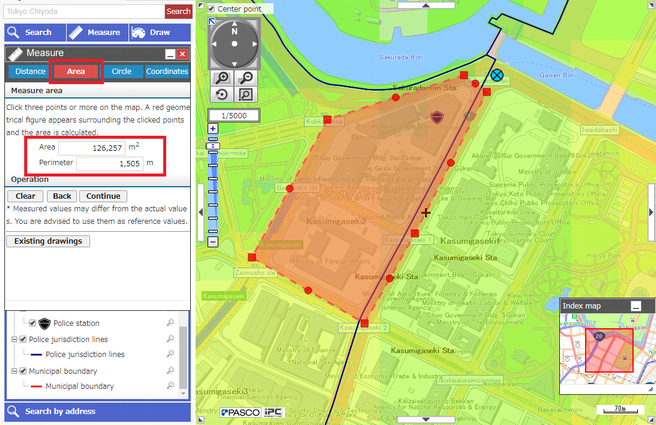
Measure area
Select the "Area" tab in the [Measure] window.
Click three points or more on the map.
A geometrical figure appears surrounding the locations specified. Its "Perimeter" and "Dimentions" is also displayed.
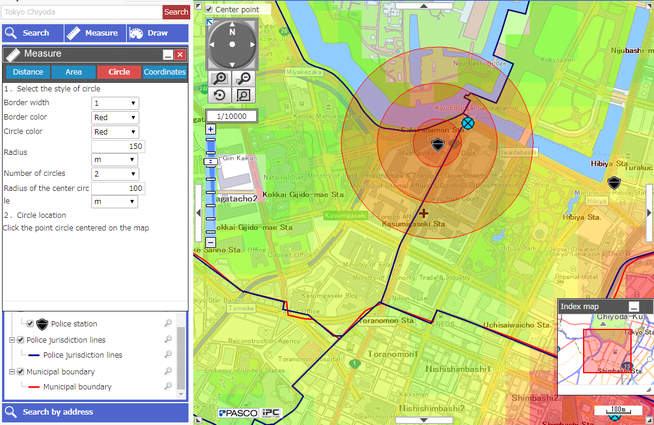
Measure circle
Select the "Circle" tab in the [Measure] window.
Specify the values of the circle and click on the map.
A circle appears centered at the clicked point.
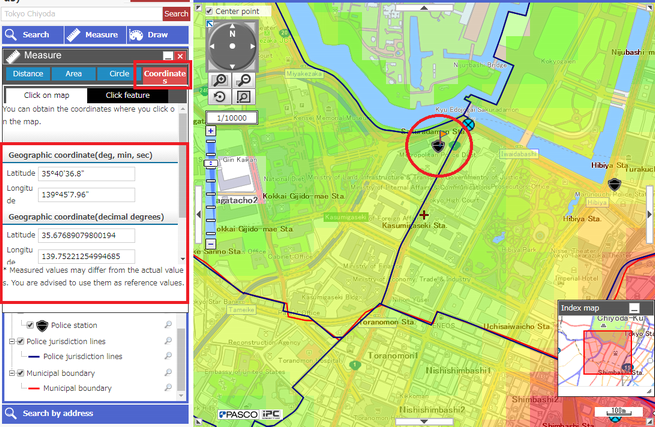
Obtain coordinates
Select the "Coordinates" tab.
Click on the map, and the coordinates of the clicked point (Geographic coordinate, Projected coordinate) are displayed.
Draw symbols
You can draw points, lines, polygons, circles, and texts in the map.
This is helpful when you, for instance, make a map of a particular district.
Click [Draw] button.
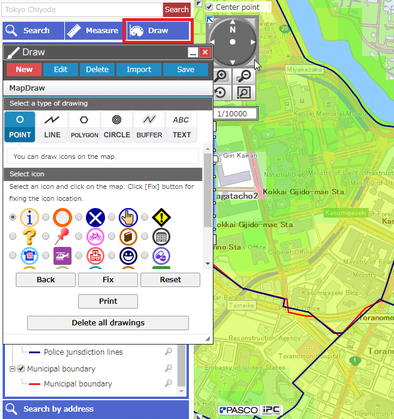
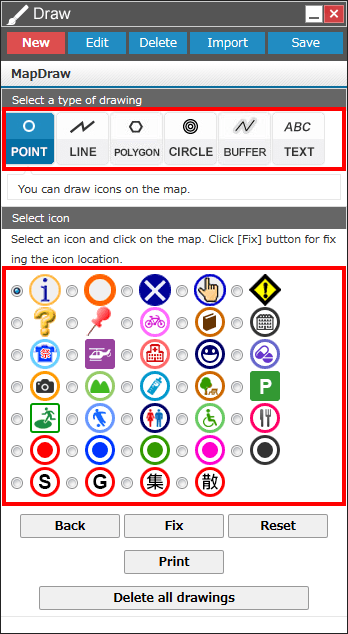
To draw a point
Select "Point" from the types of symbols, and select an icon.
Click the map. At the point clicked, the icon appears.
Click [Fix].
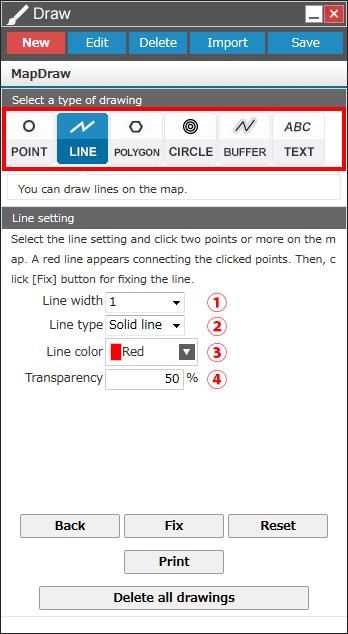
To draw a line
Select "Line" from the types of symbols, and select setting.
Click two points or more on the map. A line appears connecting the clicked points.
Click [Fix].
- 1. Select the line width from the pulldown menu.
- 2. Select the line type from the pulldown menu.
- 3. Select the line color from the pulldown menu.
- 4. Enter the transparency of the line in a value of 0 through 100.
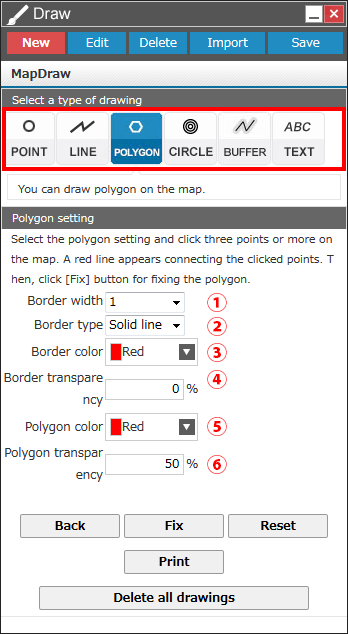
To draw a polygon
Select "Polygon" from the types of symbols, and select setting.
Click three points or more on the map. A geometrical figure appears surrounding the clicked points.
Click [Fix].
- 1. Select the border width from the pulldown menu.
- 2. Select the border type from the pulldown menu.
- 3. Select the border color from the pulldown menu.
- 4. Enter the transparency of the border in a value of 0 through 100.
- 5. Select the polygon color from the pulldown menu.
- 6. Select the polygon color's transparency as a value of 0 through 100.
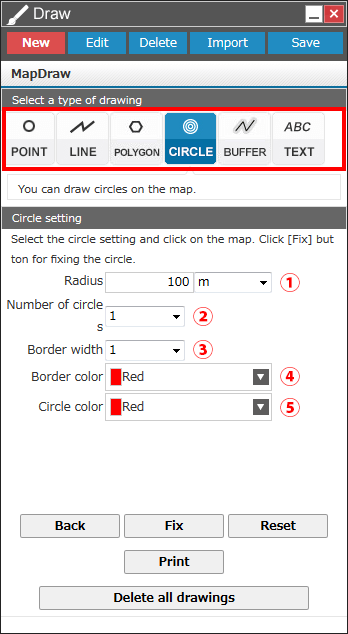
To draw a circle
Select "Circle" from the types of symbols, and select setting.
Click on the map. Centered at the clicked point, some concentric circles appear.
Click [Fix].
- 1. Enter the radius of the circle.
- 2. Select the number of concentric circles from the pulldown menu.
- 3. Select the border width from the pulldown menu.
- 4. Select the border color from the pulldown menu.
- 5. Select the circle color from the pulldown menu.
* If multiple circles are chosen, circles are drawn at a space of the radius.
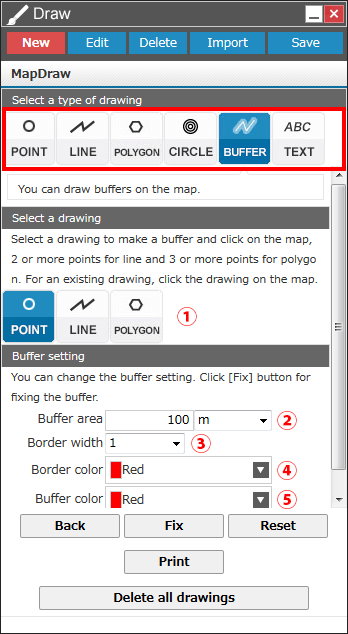
To create a buffer
Select "Buffer" from the types of symbols, and select setting.
Click on the map. The buffer appears at the clicked location.
Click [Fix].
- 1. Select a image to create a buffer area.
- 2. Select the border width from the pulldown menu.
- 3. Select the border color from the pulldown menu.
- 4. Select the buffer color from the pulldown menu.
- 5. Select the buffer area from the pulldown menu.
* If multiple circles are chosen, circles are drawn at a space of the radius.
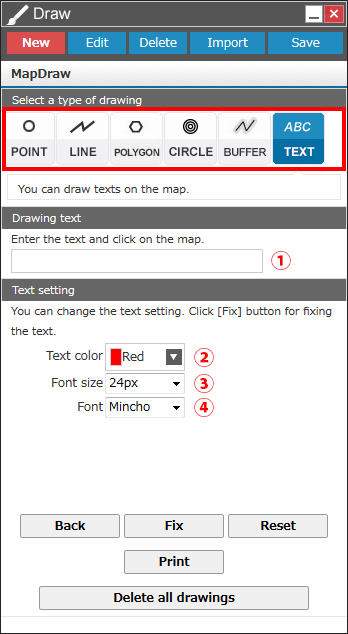
To enter text
Select "Text" from the types of symbols, enter the text(s) you want, and select setting.
Click on the map. The text appears at the clicked location.
Click [Fix].
- 1. Enter the text to be displayed.
- 2. Select the text color from the pulldown menu.
- 3. Select the text size from the pulldown menu.
- 4. Select a font from the pulldown menu.
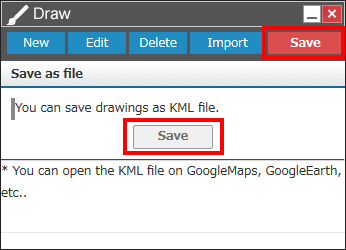
To save image drawn
1. You can save a drawn image in the KML file format.
2. Select "Save file" while the image you want to save is being displayed.
Click [Save].
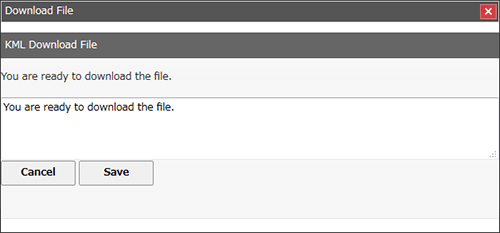
When the system is ready to download a KML file, click [Save].
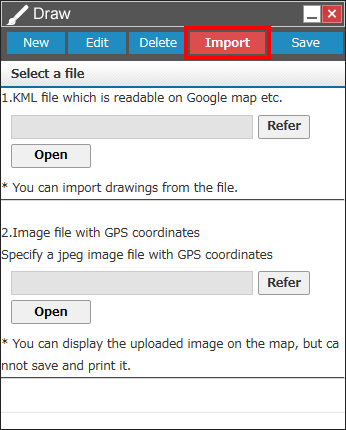
To open a saved image
Select "Import".
Click [Refer] and select the KML file to upload.
Click [Open] to display the image on the map.
You can print the map page currently displayed. Click [Print] button.
The Print setting page appears as a new page.
- (1) Select the sheet size and orientation you want from the pulldown menu.
- (2) Select what should be printed.
- (3) Check the item to display.
Select "Wide area map", "Azimuth", "Scale", "Contents" and/or "Legend" as you need. (If no facility is selected, "Show Contents" does not appear.) - (4) Select the scale. Adjust the position and scale of the map page, as necessary.
- (5) Click [Preview] button and confirm the Print page.
- (6) Click [Print] button.
Confirm that the sheet size matches the size set in the printer's Page setting. Then, start printing.
